Rails 2.0 and Scaffolding Step by Step
Rails 2.0 step by step.
Ruby on Rails 2.0 was released by the Rails core team on Friday, December 7th. There were quite a few changes in the 2.0 release, including the way that Rails generates scaffolding code. This change will probably cause trouble for people using tutorials written for previous versions of Rails. I hope this tutorial will help readers get started with Rails 2.0 and keep the community of Rails developers growing.
This is the first part of a multi-part tutorial. It will cover enough to get a scaffolded Rails application up and running under Rails 2.0.
This first installment of the tutorial will cover installing Rails and then using Rails to generate a new scaffolded application capable of the four basic database functions of creating, reading, updating, and deleting data. Later installments will cover replacement of scaffolding with actual code that will add to the model view and controller portions of the Rails application. The goal of this first part of the tutorial is to get new users over the changes made to scaffolding in Rails 2.0, and get the basic scaffolded application up and running.
Rails has proven itself to been excellent choice for the needs of most teams and projects.
Note:If you are following a detailed tutorial or book based on earlier rails version, it would probably be best to install an earlier version of Rails for use with that book. For example, the book Agile Web Development with Rails (AWDWR) by Dave Thomas and David Heinemeier Hansson is based on Rails 1.2.x. Instructions on how to install an earlier version of Rails are given later in this tutorial.
Use this tutorial to get started with Rails 2.0 and not older versions.
You will need to have MySQL installed on your system to follow along with this tutorial. You can search the web for the best way to install MySQL on your system, It won't be covered here.
Installing Rails 2.0
Installing Rails 2.0 is done the same way as in 1.2.x versions of rails. There are basically three steps to follow.
- Install Ruby for your Distro or OS
- Download and install Ruby gems
- Use gems to install rails
On my debian machine I used the following commands to install Rails 2.0.
Install Ruby:
Change to the superuser and use the debian package manager to install ruby
# apt-get install ruby irb ri rdoc build-essential
Install Ruby gems:
Then download Ruby gems, the ruby package management software, unpack it, change into the rubygems directory and run the file setup.rb as superuser:
$ tar -xvzf rubygems-0.9.5.tgz
$ cd rubygems-0.9.5
$ su
# ruby ./setup.rb
Use gems to install Rails:
The gem package manager can install Rails and all of its dependencies. As superuser issue the command:
# gem install rails --include-dependencies
INFO: `gem install -y` is now default and will be removed
INFO: use --ignore-dependencies to install only the gems you list
Successfully installed rake-0.7.3
Successfully installed activesupport-2.0.1
Successfully installed activerecord-2.0.1
Successfully installed actionpack-2.0.1
Successfully installed actionmailer-2.0.1
Successfully installed activeresource-2.0.1
Successfully installed rails-2.0.1
7 gems installed
Installing ri documentation for rake-0.7.3...
Installing ri documentation for activesupport-2.0.1...
Installing ri documentation for activerecord-2.0.1...
Installing ri documentation for actionpack-2.0.1...
Installing ri documentation for actionmailer-2.0.1...
Installing ri documentation for activeresource-2.0.1...
Installing RDoc documentation for rake-0.7.3...
Installing RDoc documentation for activesupport-2.0.1...
Installing RDoc documentation for activerecord-2.0.1...
Installing RDoc documentation for actionpack-2.0.1...
Installing RDoc documentation for actionmailer-2.0.1...
Installing RDoc documentation for activeresource-2.0.1...
Checking the version of Rails at the command line should give a version number for Rails:
$ rails -v
Rails 2.0.1
If you have trouble installing Rails follow the links above or go to the Rails Forum for help.
Using older versions
If you are using a book like AWDWR from the pragmatic programmers It would probably be best to use an earlier version of Rails. To install a previous version of Rails, use the following command:
# gem install --version=1.2.5 rails --include-dependencies
INFO: `gem install -y` is now default and will be removed
INFO: use --ignore-dependencies to install only the gems you list
Successfully installed activerecord-1.15.5
Successfully installed actionpack-1.13.5
Successfully installed actionmailer-1.3.5
Successfully installed actionwebservice-1.2.5
Successfully installed rails-1.2.5
5 gems installed
Installing ri documentation for activerecord-1.15.5...
Installing ri documentation for actionpack-1.13.5...
...
$ rails -v
Rails 1.2.5
Updating old versions of Rails
In order to update an older version of Rails to the most current, use the gem command:
$ gem update rails –-include-dependencies
Now let's see how we can get a basic Rails application up and running with a few commands
Using Rails 2.0
Getting started and checking out our installation
Creating a new project in Rails 2.0 starts out much like previous versions. This tutorial uses the example of creating an application to manage the inventory at a local Mom and Pop video rental store, Mom and Pop's Movie Exchange. We'll call the project 'exchange'.
We'll create a directory to keep our work in, change to that directory and use the 'rails' command to create the shell for the exchange application. A great deal of information will flash by on your terminal as Rails creates the basic structure of the application.
$ mkdir work
$ cd work
work$ rails exchange
create
create app/controllers
create app/helpers
create app/models
create app/views/layouts
create config/environments
create config/initializers
create db
create doc
create lib
create lib/tasks
create log
create public/images
create public/javascripts
create public/stylesheets
create script/performance
create script/process
create test/fixtures
create test/functional
create test/integration
create test/mocks/development
create test/mocks/test
create test/unit
create vendor
create vendor/plugins
create tmp/sessions
create tmp/sockets
create tmp/cache
create tmp/pids
create Rakefile
create README
create app/controllers/application.rb
create app/helpers/application_helper.rb
create test/test_helper.rb
create config/database.yml
create config/routes.rb
create public/.htaccess
create config/initializers/inflections.rb
create config/initializers/mime_types.rb
create config/boot.rb
create config/environment.rb
create config/environments/production.rb
create config/environments/development.rb
create config/environments/test.rb
create script/about
create script/console
create script/destroy
create script/generate
create script/performance/benchmarker
create script/performance/profiler
create script/performance/request
create script/process/reaper
create script/process/spawner
create script/process/inspector
create script/runner
create script/server
create script/plugin
create public/dispatch.rb
create public/dispatch.cgi
create public/dispatch.fcgi
create public/404.html
create public/422.html
create public/500.html
create public/index.html
create public/favicon.ico
create public/robots.txt
create public/images/rails.png
create public/javascripts/prototype.js
create public/javascripts/effects.js
create public/javascripts/dragdrop.js
create public/javascripts/controls.js
create public/javascripts/application.js
create doc/README_FOR_APP
create log/server.log
create log/production.log
create log/development.log
create log/test.log
Rails generates an entire framework for the application. Change into the newly created exchange directory and get to work.
work$ cd exchange
exchange$ ls -p
app/ db/ lib/ public/ README test/ vendor/
config/ doc/ log/ Rakefile script/ tmp/
Setting up the Model and Database Table
At this point many web frameworks would have to use database commands and DDL's to create the table we need to hold our movie inventory data, but thanks to Rails tight coupling between the data and the application we can use Rails to create and manage the tables our project will need. In the Model-View-Controller pattern of application design it's the model that regulates access to the data.
Rails can create the database and tables needed for the exchange project. Look at the file /exchange/config/database.yml, in it you can see the structure of the databases used in Rails:
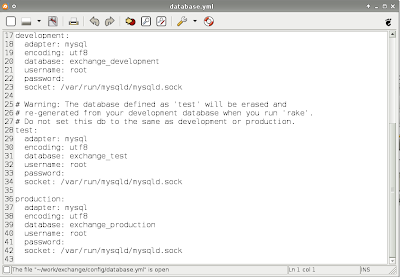
In a difference from earlier Rails versions, Rails 2.0 will create the databases needed with the
Starting the web server
Rails includes its own web server, so let's fire it up and see if we have everything working so far.
exchange$ ruby script/server
=> Rails application started on http://0.0.0.0:3000
[2007-12-13 12:01:16] INFO WEBrick::HTTPServer#start: pid=3637 port=3000
open your favorite browser and point torwards the URL http://localhost:3000
You should see something like:
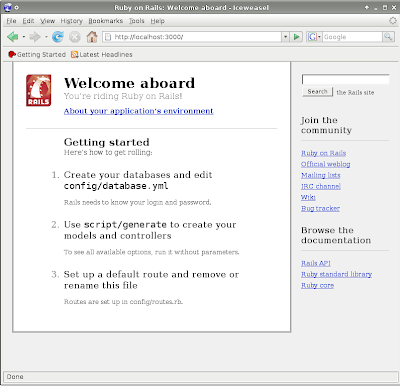
Clicking on the 'About your application's environment' link will activate a little piece of AJAX code that lists the particulars of your rails application.
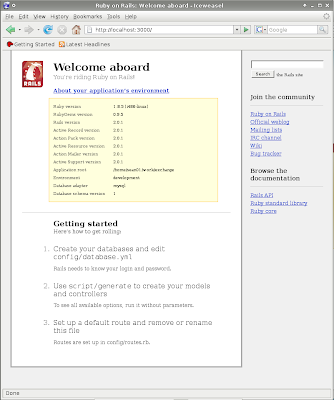
Notice that the default environment is development and not testing or production. This is just what we want during our development phase!
The next steps show where differences between older Rails tutorials will become greatest. Older tutorials would script/generate a model then use the migrate file created to layout columns in the model's database table. Next you would script/generate a controller and add scaffolding.
In Rails 2.0 it will take fewer steps, but may be a little harder to follow because so much is accomplished with so few commands. First we need to think about the movie inventory table.
The following command will generate the model, plus scaffolding, and the database migration
exchange$ ruby script/generate scaffold Movie title:string description:text one_sheet_url:string
exists app/helpers/
exists test/functional/
exists test/unit/
create app/views/movies/index.html.erb
create app/views/movies/new.html.erb
exists app/models/
exists test/fixtures/
create app/models/movie.rb
create db/migrate/001_create_movies.rb
create app/helpers/movies_helper.rb
route map.resources :movies
Making Movies
The table will get created by the file in db/migrate/001_create_movies.rb . Let's look at the file
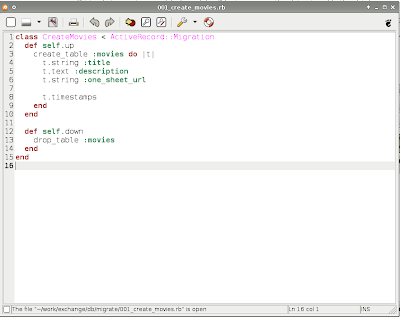
Apply this migration to actually create the table with the command:
-> 0.0040s
== 1 CreateMovies: migrated (0.0042s) =========================================
To see what our work so far has produced, start the WEBbrick server with the command (if you didn't kill the earlier one use a control-c to kill it now):
=> Rails application started on http://0.0.0.0:3000
=> Ctrl-C to shutdown server; call with --help for options
[2007-12-13 17:12:06] INFO WEBrick::HTTPServer#start: pid=4054 port=3000
point your web browse to the URL http://localhost:3000/movies and look at what we have
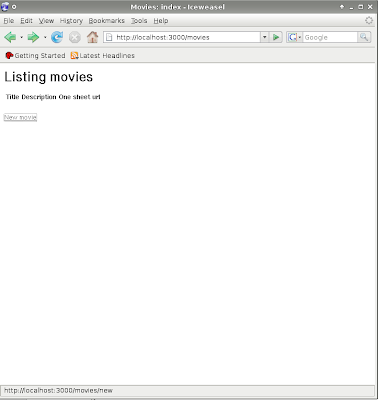
It looks pretty bare, but we don't have any inventory yet. Click on the 'New Movie' link to start adding some movies to the inventory.
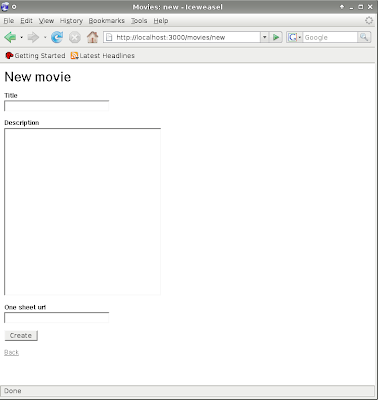
Add a title, description and path to the one-sheet and click Create.
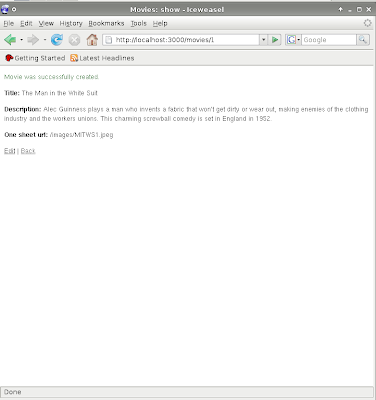
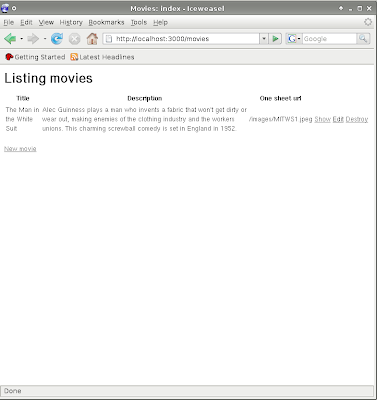
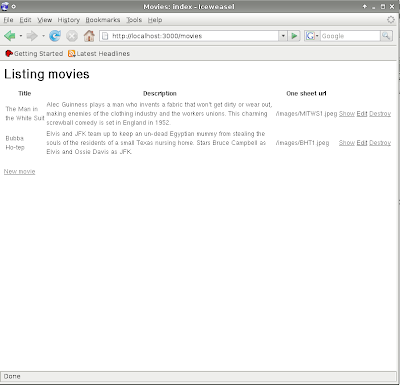
In database terms CRUD is a good thing. Its an acronym for Create, Read, Update and Delete;
What has been done so far?
Installed Rails
#gem install rails --include-dependenciesCreated an aplication with the rails command
$rails exchangeCreated the databases for the application with the rake command
$ rake db:create:allUsed the script/generate command to create the scaffolding for the application
$ ruby script/generate scaffold Movie title:string description:text one_sheet_url:stringCreated the database table using the generated migration file
$ rake db:migrateStarted the webserver with the script/server command
$ ruby script/serverPointed our web browser to the application and started entering and editing data
http://localhost:3000/movies
Part 2
Next time we'll cover some actually coding. We'll look at how to use code in the Model, View, and Controller to alter the exchange application's look and functionality as well as learning about Rails built-in test support.
The purpose of scaffolding is to get started, but scaffolding should be replaced as we add code to our project. The usefulness of scaffolding is that we have an actual functioning application right from the start. We can make a change to the view, and test that nothing else breaks. Then repeat the process adding feature after feature until the application is ready for delivery. Its much easier to make changes to an application that already works than, it is to non-functional code that doesn't give any feed back.


139 comments:
greatstuff
cant wait for the next part
Thanks Sean, your tutorial was exactly what I was looking for. After going through AWDWR, the new rails release made things a little tricky for a newbie like me.
Ditto! Looking forward to Part 2.
How do you incrementally add data fields to your model and then use scaffold to display them. I tried modifying the create_model file in the db/migrate directory and then running scaffold again but the new data fields are not there!!!
Brilliant. Great to find something that works after a few frustrating hours(!). Can't wait for the next part.
Nice work, Sean! I had been following the Lynda.com RoR Essential Training (which is good) but hit a wall when I tried executing "scaffold"(ing) per their directions. Your tutorial not only explained the reason for the error but also provided a way to address it.
Thanks again and I too am looking forward to Part II.
James 4:56
There must be a problem connecting to your database.
Are you getting a backtrace or error message of any kind?
Looking in the file /exchange/log/development.log may give hints to the error.
When I try to run scaffold again after I update the 001_create_(model).rb file in the db/migrate directory. I get a "Another migration already named create_(model).rb exists in: db/migrate/001_create_(model).rb. So the code then overwrites the views and no part of the model shows up. For the record I added a date_available:timestamp field!! What is going on?
SouthPaw,
Scaffolding as a method of the controller is no longer supported, so views are no longer automatically updated when changes are made to the model/database.
I usually start editing my views after the first scaffold generation to conform to what ever my clients have for a standard corporate layout. That means adding elements to my views by hand from an early stage.
I'll search the message boards to see if there is a way to accomplish what you want. I'll also look in the api to see if parameters passed to the script/generate scaffold command can generate a second or third migration, instead of overwriting the first.
If you start the webserver now you will see that your view has no columns listed!
Sean, thanks for the quick reply. I deleted the 00n_create_(model).rb file and ran the scaffolding again. I found that if dropped the database it would create everything fine. But if I wanted to add a field in the migration file and save it as 00n+1_create_(model).rb then it wouldn't pull that filed in. It still looks at 001.
Greg
A post on this forum discusses some alternate forms of dynamic scaffolding available for Rails 2.0.
I have not tried these myself.
so can you scaffold off an already existing migration?
I've only scaffolded when creating a new model, then replaced the view as my next step. Maybe someone reading will have an answer to re-generating scaffolding.
It sounds strange, but I like when I get away from scaffolding. If something fails it means that I forgot something and have to add my missing steps. I'm planning on updating the views and the model on the next step.
(I have some drywall to patch and a few other chores around the house to take care of first!)
I'm reading the 2.0 release notes for other new features to add.
Can anyone help me: I followed this tutorial, but now I'm trying to add a new column to my database. I've tried something outlined in an old tutorial, but it does not work. Any ideas?
Olga,
Dynamic scaffolding is not supported in Rails 2.0, that's why I showed how to scaffold when you get started.
If you are following a tutorial written for older versions I would suggest installing an older version of Rails.
You will probably have to un-install your current Rails version via gems.
One of the other comments had a link to ways of supporting dynamic scaffolding in Rails 2.0, but I have not tried any of them.
Great tutorial for Ruby noobs like myself. I've actually had two abortive attempts at getting a Rails app up and running before, and always found some glitch or problem with either the framework or the tutorial I was using. This is the first time I've managed to get a Rails app running. Thanks again!
Excellent - I was a pretty well confused last night, until I realised that installed RAILS 2.0 -Pretty powerful stuff - perhaps a bit too clever on the database side.
Eagerly awaiting part 2.
Awesome!
I'm working on part 2, but have some chores around the house to finish first.
I finished painting the dining room last night and it looks great. We're having the whole family over for Christmas Eve.
For Part 2 I want to go over the files created in the controller and view, make the views prettier, and add some validation to the model.
I'm struggling with the CSS now, so I'll probably keep it simple.
sean,
I can help you with the css for part two. just comment back letting me know.
thanks lot for the tutorial, it really helped.
tx lot! I am just searching this, but one issue still, how to use another controller to handle this "scaffold"?
When using Instant Rails 2.0 make sure to issue the create application command with the MySql flag. at the prompt:> rails -d mysql exchange
Thank you for this. It was driving my crazy.
James - I hear you. The problem occurred when you did the scaffold generate command. What looks like the first line of output is actually the continuation of the command. So it is
"ruby script/generate scaffold Movie title:string description:text one_sheet_url:string"
when i do:
ruby script/generate scaffold Movie title:string description:text one_sheet_url:string
I get the following error:
wrong constant name Title:stringController
Im sure im just a moron.
This is great info, when is the next section going on-line?
Why did the Rails developers screw the scaffold method up w/o considering backward compatibility?
Do they work for Micro$oft?
Carl
hamrin,
I've just started working on the next section. I'll look at the Model View and the Controller.
Traditionally a major version number change is a sign that backward compatibility is broken. Since you can still use older versions of Rails, and freeze your project to a version, this is not too big a problem. As to why the change in scaffolding away from dynamic to one time, we can only follow the explanations given. I'll say that in my experience doing work for clients, scaffolding doesn't survive very long. Clients usually want a certain look to their sites, and that drives the design and look.
I think that dynamic scaffolding is nice because it is driven by the data, but the people paying the bills don't usually see things from the data's point of view. They want the data presented their way. the few Rails projects I've done for clients, the scaffolding is thrown away pretty quick. I'm guessing this is true for many others as well, and has lead to the change in Rails 2.0
No, they don't work for Microsoft.
I've finished all of the drywall repair in my home, and have gotten the painting done. The kids are back at school after the holidays, so hopefully I'll get a few more installments up in a week or so.
I apologize for the delay.
Having being through the excellant 'Rails Solutions' friends of ed, I got lost when it introduced the scaffold function in the last chapter. This got me back on track, thanks.
Same here!
Rails Solutions" friends of Ed seems to be older than Rails 2.*
i had plenty of trouble trying to keep up!
thanks for the great post!
when should we expect part 2 :)
can't wait
Superb! Saved my day!
Thanks a lot!
Sean, I have nothing new to add: major kudos from this very noob Ruby/Rails enthusiast!
I realize you have a 'real life' and that this blog isn't the highest priority of that life so please don't hear me as nagging when I say:
I'm eager to see your next installment in this series! :)
Thanks again!
Part two is up.
http://fairleads.blogspot.com/2008/01/this-is-second-part-of-my-series.html
Please leave any corrections you find as comments and I'll get to them ASAP
-Sean
Thank you so much for this tutorial. I just began learning RoR and all of the older books and knowledgebases are outdated when it comes to scaffolding. This helps out a lot. Thanks!
After following all of the steps in the tutorial, I still cannot get title, description or one_sheet_url to show up on the main page (only Listing movies and New movie link). Clicking the link shows everything but these same titles and their corresponding fields. The developer error log didn't show any errors. Rails was able to access my DB when it created the databases and I verified that the DB user had full permissions. Any ideas?
Here's the last few lines from the dev log:
Processing MoviesController#index (for 127.0.0.1 at 2008-02-06 05:19:42) [GET]
Session ID: BAh7ByIKZmxhc2hJQzonQWN0aW9uQ29udHJvbGxlcjo6Rmxhc2g6OkZsYXNo%0ASGFzaHsABjoKQHVzZWR7ADoMY3NyZl9pZCIlNTgwMGVkNmQ4NjEwYjdmODk1%0AZmE3OTM2ZjBlY2ViYjM%3D--64bc55bd77d308af3dc4f5040526a08a4b1dbe6c Parameters: {"action"=>"index", "controller"=>"movies"} ^[[4;36;1mMovie Load (0.000348)^[[0m ^[[0;1mSELECT * FROM `movies` ^[[0m
Rendering template within layouts/movies
Rendering movies/index
Completed in 0.00802 (124 reqs/sec) | Rendering: 0.00142 (17%) | DB: 0.00035 (4%) | 200 OK [http://localhost/movies]
How does one generate scaffolding when a database and tables already exist?
woofwoof,
Look into passing the "--skip-migration"
parameter to the generate scaffold command:
"script/generate scaffold Table_name column1:string column2:integer --skip-migration"
When I did this:
rake db:create:all
I got this:
rake:17: undefined method `require_gem' for main:Object (NoMethodError)
The solution is to update rake:
sudo gem install --remote rake
I learned that here:
http://blog.nanorails.com/articles/2007/12/20/ruby-gem-1-0-is-out
As an aside, I came to this tutorial after I discovered
that all the other Rails tutorials had became obsolete
a couple of months ago. And then this tutorial, for
which I am grateful, has something to be updated.
I guess I had kinda hoped that Rails reached a level of
maturity where you could count on using google to find
a tutorial. I hadn't realized it was still having growth spurts.
Robert
awesome tutorials. they were easy to follow and a great introduction to rails2.0. i can't wait for the next one(s).
do you think you'll talk about adding user accounts?
keep up the great work!
I had recently upgraded to 2.0, and i followed u'r tutorial to crete scaffold... but interestingly, the forms fields are not seen at all... and there is no filed to enter
Do I need to edit the rhtml manually?
Great tutorial and I am ready to move onto number 2 but I am having issues with part one still. My issue is the same as James is having up in comment number 4 about no fields displaying or data showing up.
If I manually add rows to the database, the pages recognizes there is data in the fields and shows the "show | edit | destroy" links, but not the actual data from the database.
I have checked my connections and privileges to the mysql server (both Ruby and MySQL are installed on my Mackbook Pro) so everything should just be localhost.
Any ideas? Thanks.
Chris Klosowski,
I never did figure out what was causing Jim's error.
Maybe I'll have to write about debugging and using script/console.
See what's in the model at various points.
Great work on rails 2.0! I'm so sick of reading outdated tutorials... this was a relief even though I feel like I learned more from reading the older ones.
I can't however get to the nice bit, I keep getting the same error:
"NameError in Myfile#index"
"Showing myfile/index.html.erb where #24 raised..."
I'm running rails on os x ... any ideas ? Following your tutorial closely...
This is fantastic, its been a real headache following rails tutorials that were written before 2.0. Thanks alot
I followed the tutorial and I'm getting class errors. My "movie" page comes up but when I click on "New Movie" I get this.
undefined method `title' for Movie id: nil, created_at: nil, updated_at: nil
I'm guessing something in my classpath is goofy.
Thanks for your tutorial, especially on how to get Rails 2 running on a Debian.
That said, let me mention, that at my box at work everything went fine and what you described ran out of the box. However, on my home machine, things worked out a little less lucky, as "rake db:create:all" refused to work, throwing a "rake aborted!
no such file to load -- openssl".
As I already had experienced your tutorial ran through at work without a wink, I suspected my Sarge->Etch upgrade Debian might been broken in some way. -- Here I guessed wrong, it indeed was just a missing ssl library, "libopenssl-ruby" to be exact. You can get it by "apt install libopenssl-ruby".
As I ran into this and had not the least idea what was going wrong, and got hinted where to look at & for, I want to share that hint with anyone else who might (been) run into this issue.
Hope, I could help a bit.
Great tutorial. I tried other tutorials and I alway had problems. But your tutorial works as a charm. Thanks a lot.
I am completely new to ruby and rails, started with 2.* and got stuck cause most of the documentation I found was about rails 1.*
I was about to give up on rails. Now finally, I got something working. Great page. Thanx!
Great stuff. This makes the difference between running away from RoR and actually using it. Thanks!
Hi,
I am following along the tutorial, but when I get to the point to create the databases, and when I type:
rake db:create:all
I get:
(in /work/dev/exchange)
rake aborted!
Don't know how to build task: 'db:create:all'
Has anyone seen this problem before/or is able to give me some help ?
Thanks,
--MD.
Thank for the great tutorial! So glad to get some up to date info! I'm using Ubuntu Gutsy and any users with a similar configuration might find they come across the same issue when traversing this tutorial:
rake db:create:all fails and spits out the following error:
rake aborted! no such file to load -- sqlite3
this is because the database.xml is not configured correctly, go here to see a fix.
Marcio,
Please see Steven's answer for a SQLite reason.
If you are using MySQL, then your Rails is not talking to MySQL correctly.
Do you have a copy of AWDWR? It has a good section on connecting to MySQL.
Hi Sean,
I figured out. I did my installation on Fedora Core 7, and for some reason I ended up with an older version of Rails (not 2.0). It became aparent after the command:
$ rake --tasks
Did not show db:create:all as a possible task. I removed the older version and downloaded 2.0 and now everything is fine.
Thanks for your answer though.
very nice kick start to ruby 2.0, its weird that ruby 2.0 has changed so much that the tutorials and books for earlier versions are not useful anymore. And there are not a lot of tutorials out there for 2.0, this one really helped, thanks
i'm a newb and you are a god among men. seriously.
Is there any way to generate scaffold for a model and corresponding table (with data) that already exists, in Rails 2?
Thanks
Thanks so much for this article. I'd been trying to follow a couple of the tutorials linked to on the RoR main site and was about to give up on on rails.
Hi,
Firstly, THANK YOU for a 2.0 tutorial. I have been going quietly mad trying to use older tutorials (and am starting to be a bit sorry I started investigating RoR at all, to tell you the truth).
I have followed your steps precisely afaik, but everything I try to access once the server is up gives me:
Routing Error
No route matches "..." with {:method=>:get}
What is happening? Why???
Aahhh! Ok, my problem was "simple", but highly-indicative of an immature product. I had hand-crafted some migration code, and once the scaffold command found my files it threw up and died without creating any controllers.
Sorry, but that's pathetic. Daring to hand-code ANYTHING shouldn't result in a non-usable installation.
I'll persevere for a day or two more, but JSP is looking shiny and clean right now.
Great tutorial, thanks a lot!
I was having problems in the scaffold creation as tried to follow all that outdated tutorials out there and finding yours was like the light at the end of the tunnel.;-)
For those out there that had the problem of field not showing up I had the same problem and found out it was because I decided to create the db directly from mysql.
If you define you table and row:content_type when creating the scaffold the you should get your fields to show up. Or at least it worked for me .
So instead of
ruby script/generate scaffold City
I used (like in the tutorial)
ruby script/generate scaffold City name:string country:string continent:string
I guess you can do the same if you already have an existing database but the you have to skip the rake db:migrate part.
Cheers
thanks for the nice article...
I have an existing production application to migrate from version 1.2.3 to 2.0.2. It is exciting to see the new features and the upgrade was painful :-(
I had a directory structure for my admin scripts. So the related controllers were under that directory "admin". I used the following command to regenerate/update my code and everything else needed for the scaffold. But there was some confusion.
ruby script/generate scaffold Admin::Language
Using the controllers as an example. Instead of "language_controller.rb", "languages_controller.rb" was created. Was this correct? No big deal. I can change my code to plural.
However, if I choose to upgrade an existing controller "site_controller.rb" by using the following command, it is still kept as singular form, instead of in plural.
ruby script/generate controller Site
(This controller doesn't have a corresponding model. So I chose not to use the following command.)
ruby script/generate scaffold Site
So what is the convention of controllers etc in Rails 2.0.2. Is it in plural or singular forms?
Thanks!
Another question is,
what is the preferred way to have a URL like domain/admin/controller/mothed/id ?
I could create a directory "admin" and put all related controllers under it to achieve the above effect.
Is that still the recommended way in Rails 2.0.2? I tried it but the code didn't just work and I think have to manually treak it to make it work. (In the erb file, it refers to, sth like, say, @domains, but the controller file only has @admin_domains )
Anonymous 1:01,
the new RESTful controllers are pluralized almost like db tables names.
There is a discussion at the rails forum on this:
http://railsforum.com/viewtopic.php?id=13799
You should manually specify routes some examples:
http://railsforum.com/viewtopic.php?id=15725
Thank you for demonstrating the new scaffold method. I've been searching and searching for a detailed answer.
Goooood!
This is what I looking for!
Thank you, Sean.
your blog is good and everytime i am refering from this blog.thanks for ur post
I can't get the rake db:create:all to work. OSX 10.5, rails 2.0.2. I've ensured MySQL is running, and it has no root password. I ran the initial rake with "-d mysql"
rake db:create:all
(in /Users/monk/Ruby2.0/book)
Couldn't create database for {"encoding"=>"utf8", "username"=>"root", "adapter"=>"mysql", "host"=>"localhost", "password"=>nil, "database"=>"book_development"}
Couldn't create database for {"encoding"=>"utf8", "username"=>"root", "adapter"=>"mysql", "host"=>"localhost", "password"=>nil, "database"=>"book_production"}
Couldn't create database for {"encoding"=>"utf8", "username"=>"root", "adapter"=>"mysql", "host"=>"localhost", "password"=>nil, "database"=>"book_test"}
Just upgrading to Rails 2.0.1 and your blog has made the journey so much easier. Thank you for the wonderful blog.
Thanks Sean, 3 weeks ago I was following the tutorial from Agile Web Development with Rails and after to struggle with every single tutorial I found in Internet (rubyonrails.org is full of deprecated tutorials referring the previous version) I gave up. Tonight I find your blog and everything works with my RoR 2.0.
Peace!!!
Paco Reyes (Peru)
This is a well organized and outlined tutorial. Thanks for taking the time.
cheers, gerardo
Nice and thorough howto!
Just wrote some notes on basic setup and some useful overrides of ActiveScaffold here:
http://blog.akilles.org/2008/04/17/ruby-on-rails-experimenting-with-activescaffold/
I just took a tiny break from working on my RoR project to find this place and let you know how grateful I feel for your tutorial which actually works. Perfectly.
And to add to the many comments, you are an excellent teacher, because you explain terms as you go.
I am brand new to RoR - I have learned quite a bit from just struggling to figure out the problems in the many books and tutorials which don't work in 2.0.2 - but most of them, in the end, just don't work, and I don't know enough to make them go. And unfortunately, most of the ones that claim to work with 2.0 also don't work.
This one do. Does.
Thanks Again - David
Wonderful.
I'm a starter of RoR 2.0, the tutorial failed while I starting my RoR.
And I checked via google, your article is what I need.
Thanks a lot!
Great tutorial! How can I add a table and get the views to be seen? I get the error msg "Uninitialized constant RecordsController" when I try to access it in a browser.
Thanks
Thanks for the great tutorial! You're the first search result for scaffolding rails 2.0 in Google and I figured some people may be looking for the quickest and easiest way to get the old rails scaffolding installed instead so they can complete there tutorials or just get a quick "admin" controller up for an app that has already been written.
So for those people: If you want legacy scaffolding, you need to install two plugins:
script/plugin install scaffolding
script/plugin install svn://errtheblog.com/svn/plugins/classic_pagination
This is the first RoR tutorial that gave me a real insight into understanding the Rails framework
Thanks for the great tutorial! You're the first search result for scaffolding rails 2.0
kral oyun
Oh good grief!
Thanks for shedding light on this - I was going bonkers trying to find the answers to my 2.0 problems.
Thanx much!
Thank you! This tutorial is wonderful. Just getting started with ruby and rails, and this is great.
Trying to learn Ruby using AWDR v1 and Rails v2...its been difficult so far. Just found your tutorial today and its very easy to follow. Thanks very much.
Short of a half year later, and Rails 2.1 has been released. The best way to learn Rails 2.1 is with Agile Web Development with Rails, 3rd Edition and the free "What's new in 2.1" e-book that's up at Riding Rails.
Thanks A LOT!
I spent 2 days, learning Rails2 and it was quite difficult, because most of the tutorials are about older versions. Found Your article and it REALLY helped to get started.
Sean, thank you! I thought I was going crazy until i came upon your blog. Rails was supposed to be easy; i think they should have just come up with a scaffold2 method to preserve the old functionality. Anyway, you're a hair saver for those of us who were pulling out our hair!
the
db/migrate/001_create_movies.rb
file created is not at version 001 it at version: 20080622141306
could you give me some help with this, is there something wrong with my server or database setup?
Gr8, u have explained everything very clearly. Easy for everybody to understand
There is a GOD!!!
Thank you very much...
Guys if you mess this tutorial up then give up....this is easiest REAL 2.0 tutorial i came across
Thanks
Daniel Lee - London UK
Hi All ... I am getting stuck at the point where we scaffold the DB ... I am getting the following at the command line
Mr.Anderson:expenses neo$ script/generate scaffold event name:string budget:decimal
wrong constant name Name:stringController
Any idea what am I doing wrong here?
Thanks much
This is a good tutorial to learn rails applications and its functionality.
thank you
thank you
thank you
I have a question:
to add a table to the database do I use scaffolding again or is there another method?
brian
This is a good tutorial to learn rails applications and its functionality.
This is the first RoR tutorial that gave me a real insight into understanding the Rails framework
Thank you for demonstrating the new scaffold method. I've been searching and searching for a detailed answer.
Fantastic tutorial - thank you! I've been wanting to get rails installed and working for the last 6 months, and thanks to this page, I finally have it.
Excellent.
What if I want to add a new column or remove one or update one? Rails doesn't like it when I try running the same scaffold code with an additional column.
cheers.
Thank you so much, awesome!
Nice tuto!
Thanks a lot!
Great! Helps a lot!
Thanks you from Romania for this tutorial .. You are awesome!!!
Very helpful and very much appreciated!
i have a question:
to add a table to the database do I use scaffolding again or is there another method?
brian
I attempted to generate the application with the default sqlite3 database and when I did the "rake db:migrate" I got stopped dead cold with the message
"rake aborted!
No migration with version number 3"
Is it necessary to have MySQL running to complete the tutorial?
Great demo - though just one point - the current option for defaulting to MYSQL is -D, not -d..... major head scratching trying to understand why rails went off and created 2 applications!
thanks a lot, very useful post
grazie
thank you so much. I was up until 3 am trying to follow a tutorial and this was much better and easier to follow. got it working in 15 minutes. very nice!
Merci beaucoup, enfin un tuto complet qui marche !!!
Thanks for the great tutorial. How did you dump output of commands? Did you manually copy/paste after each command? or is there any tool/setting for this?
Thank for this great tutorial. I have a question, i am curious what databases and tables are created and where they locate. I have mysql 5 and sqlite3 on my Mac Leopard. Im sure mysql 5 is running, Not sure about sqlite3. I try to log in mysql as root and query the database/tables after i added some entries using scaffolding. To my surprise, the tables are empty, even though there are entries I query from web interface.
Thank for this great tutorial. I have a question, i am curious what databases and tables are created and where they locate. I have mysql 5 and sqlite3 on my Mac Leopard. Im sure mysql 5 is running, Not sure about sqlite3. I try to log in mysql as root and query the database/tables after i added some entries using scaffolding. To my surprise, the tables are empty, even though there are entries I query from web interface.
Found a good Tutorial for setting up RoR in Windows with Instant Rails.
www.sucklessatrails.com. It made things way easier so I could get down to writing code. Thanks for the Great tutorial.
Like everybody else, thanks for a great 2.0 tutorial. I crashed and burned through several tutorials before I realized that 1.x doesn't fly in a 2.x world.
Also, I went through a series of updating software - ruby, gems, rails, mysql, and the whole netbeans suite before I got things working smoothly. I recommend that people who are having difficulty make sure that all of the s/w is updated to most recent versions.
I had to start this tutorial 4x before I got everything right, but when I did it went very smoothly.
Thanks again - looking forward to part II.
Dumb question?? Does Mongrel have to be running to run rails. Can Ruby on Rails run on just Apache on windows properly?
Thanks,
Joe
This is an amazing tutorial! Many thanks!!!
I did get the odd/even coloring working by replacing
#movie-list .list-line-even {
background: #ffccff;
}
#movie-list .list-line-odd {
background: #d0d0d0;
}
with
.list-line-even { background: #ffccff; }
.list-lint-odd { background: #d0d0d0; }
in the CSS file.
Nice one. Very clear. I had the old tutorial problem you predicted. Very frustrating.
Thanks a lot. God bless.
Sean-
Is there any way to create scaffolding with Rails 2.0+ and not have to list out every field in the script/generate scaffold command?
I want to create a scaffold with 19 different fields!
thanks!
jeff
Jeff,
Before 2.0 Rails had dynamic scaffolding that would pick up fields as they were added.
As of 2.0 only the fields listed in the generate scaffold command will get auto scaffolding. You will have to adjust the views if you add fields after the first scaffold.
There is the active scaffold plugin that you might explore:
ActiveScaffold - http://activescaffold.com/
Of course if you add the fields all at once or one at a time, you still have to type all of the field definitions and do the migrations.
Most people have found that scaffolding is removed pretty quickly, and this is what resulted in dropping dynamic scaffolding.
Good luck
Sean
You are seriously my hero!
Finally someone shares all about ruby. I'm so glad I found your blog, you have made me so happy =D
Thanks!
Thanks a lot !
Your 2.0 tutorial is really amazing.
I'm basically a PHP programmer and recently moved to RoR. I was not getting the correct information about scaffolding, but your tutorial made so easy. i'm so thankful to you. I want to get few more tutorials about building application with administrator end and front end seperate. Also how to create or add login to the project.Please provide me the reference for same powerful tutorials. I'm waiting for your next tutorial on error handling and debugging :-)
Thanks once again!!
Subodh D. Choure
Thanks so much you tutorial helped tons.
Thank you for this very good subject
Thanks a lot !
Your 2.0 tutorial is really amazing.
I'm basically a PHP programmer and recently moved to RoR. I was not getting the correct information about scaffolding, but your tutorial made so easy. i'm so thankful to you. I want to get few more tutorials about building application with administrator end and front end seperate. Also how to create or add login to the project.Please provide me the reference for same powerful tutorials. I'm waiting for your next tutorial on error handling and debugging :-)
Read a long time I was really successful.
Thanks so much you tutorial helped tons.
very nice kick start to ruby 2.0, its weird that ruby 2.0 has changed so much that the tutorials and books for earlier versions are not useful anymore. And there are not a lot of tutorials out there for 2.0, this one really helped, thanks
Great tutorial !!! Saved me from hours of Work...
Beautiful...God Bless u.!!
Thanks from Argentina!
Thanks from Indonesian developer
Thanks for the great post!
This is a great tutorial, and it was of a very big help for me. Thank you very much for you eork!
its weird that ruby 2.0 has changed so much that the tutorials and books for earlier versions are not useful anymore. And there are not a lot of tutorials out there for 2.0, this one really helped, thanks
I want to get few more tutorials about building application with administrator end and front end seperate. Also how to create or add login to the project.Please provide me the reference for same powerful tutorials.
Very clear. I had the old tutorial problem you predicted. Very frustrating.
Great tutorial !!! Saved me from hours of Work...
This will sound as a multiplyer. Nevertheless: I spent hours trying to work through othter courses, but all f them left out essential instructions, so I got stuck with errors and loads of frustrations. Then finally I excecuted the steps in this tutorial and voila, In less then 10 minutes I had a working site. This proofed the power of RoR an I am definitaly becoming a rails developper now.
Howywoy
I am glad that i found your post on Ruby on Rail.I was looking this types of post.Which help me in my project..Thanks for that
I want to get few more tutorials about building application with administrator end and front end seperate. Also how to create or add login to the project
I think most people would agree with your awesome article which is specially related of stillasutleie. I am going to bookmark this web site so I can come back and read more articles. Keep up the good work!
layher
Post a Comment